
Scanning Covers
Scanning covers is only a challenge until the proper steps are learned. Unfortunately, the nature of most scanners and software make learning a challenge. Scanners and the software supplied with them are designed to scan a snapshot to email to grandma. This work will require settings and skills that the "user-friendly" equipment tries hard to hide. It is additionally complicated by a lack of standardization in software. Like or hate Microsoft Office, it dominates the category so that other competing programs are forced to follow its conventions. Learning one spreadsheet or database makes using any other spreadsheet or database easy. This is not so with graphics programs and scan acquisition software. Not only are commands and procedures very different, they call the same operation by many different names.
Scanners are sold on the features needed to handle transparencies and feed documents and their maximum possible resolution. None of these features are necessary to scan covers. In general the cheaper the scanner, the more suitable to scan covers. You will not scan transparencies, feed documents or use any resolution beyond 150 dpi. A $50 "Brand X" low end scanner is far more suitable than any "name" brand, especially all in one scanner-fax-printer units.
Even a $50 low end scanner comes with software. At one point, this would include a minimum of two programs, a scan acquisition program and a graphics image manipulation program. Now this is rarer. A scanner may come with dozens and dozens of programs, but rarely a graphics program. Instead, they make a very feature rich scan acquisition program to be used to both acquire scans and perform basic image manipulation. Unfortunately, this makes them unsuitable for both purposes.
The gold standard for graphics programs is Photoshop. It is expensive and has uncounted features that take a lifetime to master, virtually none of which are necessary for scanning covers. It does however produce the highest quality images in the smallest size. It is not necessary to use the latest version. Any version greater than Version 5.5 can do cover scanning equally as well. Versions earlier than the current CS 2.0 are available for much lower prices. Photoshop Elements is based on the same engine as Photoshop, missing some of the high end tools and containing a number of simplified wizards to perform common tasks. It is priced much less then Photoshop. The lack of the high end features is not a problem, but the "user friendly" wizards make it harder to use for cover scanning. If time is taken to get past the simplifications, it does a good job of producing small, high quality scans.
This is a link to an article on philatelic scanning. Please click here to read it. It explains the concepts of resolution, screen size, and image size.
This is the process that I use with Photoshop and a generic scan acquisition program. If you use different software, the process will be similar.
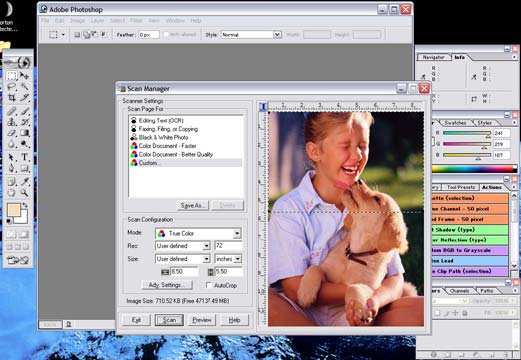
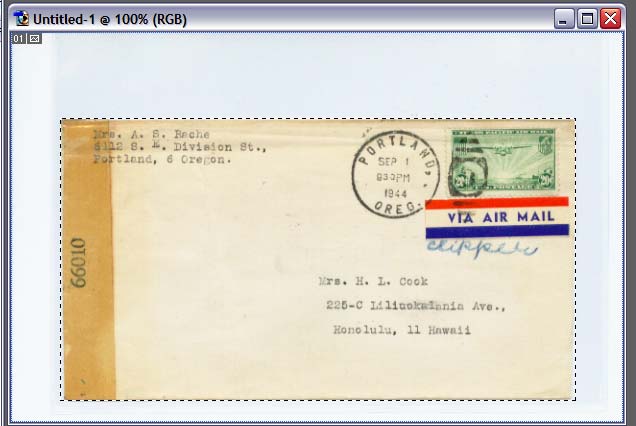
The first step is to call up the scan acquisition module from the graphics program. Please note that I have selected the scan to be at 72 dpi. I will not do a preview scan, instead selecting about half the platen of the scanner. Remove the slip from the cover holder and leave the cover in the holder. Place the cover cover all the way down in the holder to make the scan as straight as possible. Use the top edge of the cover holder as a straightedge on the platen. Scan the the cover.
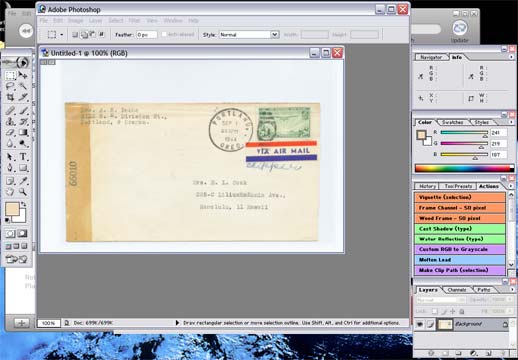
After the scan is made exit from the scan acquisition module. You'll see something like this:
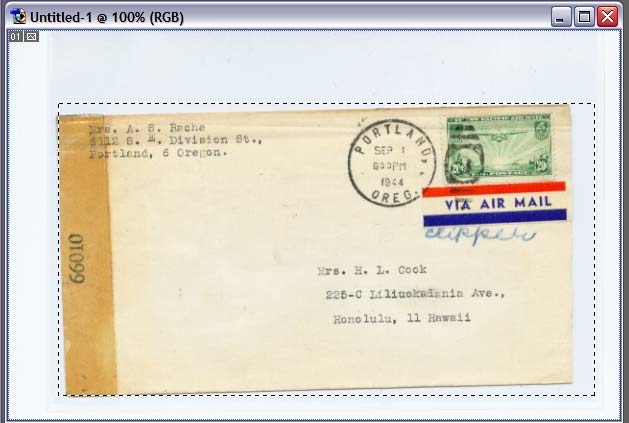
The next step is to straighten the scan. No matter how carefully you place the cover, it will likely be off. Use the rectangular tool to see how much needs to be corrected.
Straighten the scan by rotating it. In Photoshop, choose Rotate Canvas Arbitrary under the Image menu.
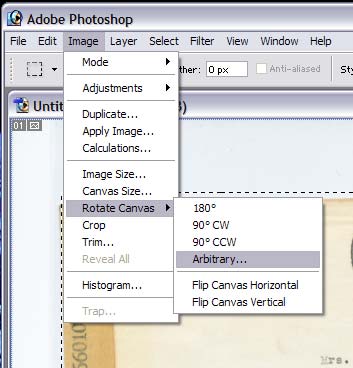
The command will bring up a dialog box were you choose how much to rotate the image and in what direction. Pick the a number to set the scan straight. Until your eye develops, you may have to do this more than once. You should end up with this:
Next step is to crop the image. The object is have an image of the cover alone, with no border. Since not all covers are perfect rectangles, a tiny bit of white space may be inevitable. It is also acceptable if a tiny bit of the actual cover is left out of the scan. If this happens, be sure no part of the address or return address is lost. Be especially careful of the stamp's perforations. DO NOT CUT OFF A STAMPS PERFORATIONS.